
Figure 8
In the last chapter you have learned how to use your editor. It should be apparent that creating stairs only requires creating a sector for each step and changing the floor heights. Because of this, I will not go into detail on making stairs, except for later when I cover the linedef action that builds stairs.
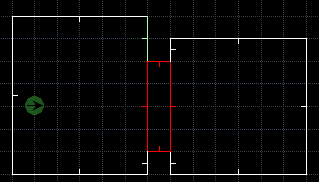
1. Creating a Simple DoorOne of the most difficult topics for a new mapper to understand is creating doors. They are not vary hard, in fact you won't even need to use sector tags. To create a door, make a sector off a wall that will be your door, then make another sector behind it, as shown in the diagram.
The most common mistake in doors relates to the lines marked B, if you look closly at figure 8 you will notice that they are both facing out to the rooms. A linedef action will only activate from the front side of the line so if the lines are facing in, the door will not open. To fix this problem simply select the lines and press the flip button (should be F). Do also note that the lines that play the role of the track (lines A) should not be facing out however.
Once that is done you will need to lower the ceiling of the sector all the way to the floor, for example if the floor height is 0, the ceiling height should be 0. Because of this the texture of the door should be placed as the upper texture. (While we are on this topic it might be useful to note that the door can start at any height you wish, it just will just close all the way after the first time it is used.)
Now on lines B we need to set the linedef action to "Door Open Wait Close" which happens to be action #1.[1] If all is done correctly the door should now open when the player uses it. However there is still one problem the lines representing the track scroll with the door! To fix this edit both lines marked A to have "Lower Unpegged" checked. If all works as intended congratulate yourself on your first working door! If you are still having problems, check your work with this example wad [../examples/door.zip].
[1] Numbers are subject to change based on game configuration.Now that you have made a door, changing this to a locked door (one that requires a key to open) is simple. All you have to do is change the linedef action from #1 to one in the table below.
| Action # | Key | Description |
|---|---|---|
| 26 | Blue Keycard / Blue Skullkey | Repeated: Open Wait Close |
| 27 | Yellow Keycard / Yellow Skullkey | Repeated: Open Wait Close |
| 28 | Red Keycard / Red Skullkey | Repeated: Open Wait Close |
| 32 | Blue Keycard / Blue Skullkey | Once: Open Stay |
| 33 | Red Keycard / Red Skullkey | Once: Open Stay |
| 34 | Yellow Keycard/ Yellow Skullkey | Once: Open Stay |
In some cases we do not want the player to directly be able to activate a door, in this case we would use a switch. Of course switches serve more perposes then just making remote doors, a switch can cause the floor/ceiling to raise or lower, they can build stair cases, or a variety of other things. Here I will show you how to make the door in the last tutorial become opened by a switch.
Look at figure 9, the sector highlighted in red should be our door, open up the sector editor and make the sector tag 1. If you are going from the previous example, be sure to change the outside linedefs to have no action. Next, edit the linedef in green to also have a sector tag of 1. In the linedef action put the number 103, which is "S1 Door Open Stay". This means that the switch will only work once to open the door. If done correctly, when your mouse is hovering over the switch's linedef the door's sector should turn yellow. You may also want to give the switch (line with the action) a texture starting with the name SW1 or SW2.
That's all there is to it! If you are having problems try comparing to this example wad [../examples/remote.zip]. Now you can try making the switch do other things, for example raise the ceiling back up to 128 units and make the switch activate a crusher (action #164), or raise both the floor and ceiling to 128 (remember to place a lower texture on the outside linedefs) and changing it to a lift (action #21). You can even try an SR action if you like.
2.1. Switch TexturesA thing to note is although it appears as if you can add more switch textures by naming them SW1XXXXX and SW2XXXXX, it is not possible to create new switch textures in the orginal doom engine. Ports like ZDoom have added a method to do this however. In the case of ZDoom you would use ANIMDEFS, below is the code you would put in the ANIMDEFS lump to add a switch texture.
switch SW1XXXXX on sound Switch1 pic SW2XXXXX tics 0
switch SW2XXXXX off sound Switch2 pic SW1XXXXX tics 0
I will talk more about adding textures and ANIMDEFS later in these tutorials.
3. Walk Over TriggersIn most cases switch actions are insufficant for making traps. Originally walk over triggers (WL and W1) were also required to make teleporters, but that has since changed. These work the same as switch actions, the only difference is the player must be able to walk over the line, also the action will only occur when the player walks over the front side.
The example wad [../examples/walkover.zip] demonstrates these on the exit action (#52), but you could vary well use these specials to lower a wall, open a door, lower a lift, start a crusher, etc.
Back to TOC