Figure 1
Some common terms between all editors are sectors, linedefs, sidedefs, and vertices. A sector is the space between a set of linedefs forming a polygon. A sector contains a height for the floor and ceiling, a texture for the floor and ceiling, a light level, and optionally a sector effect and sector tag. A sector effect can hurt the player, define the sector as a secret, or make the light level change. A sector tag is a number in which the editor uses to reference the sector; these allow switches to interact with the sector.
A linedef is, as it sounds, a line between two vertices. A linedef holds many values such as linedef action, which in most cases effects a sector by sector tags. Linedefs also hold many flags which define how the engine should handle the line. For example if the line should block monsters, sound, and/or all actors. A few texture rendering flags exists called upper unpegged and lower unpegged, these will become important when it comes to doors and aligning textures. Two lines should never cross without a vertex splitting them, otherwise undesired effects may occur.
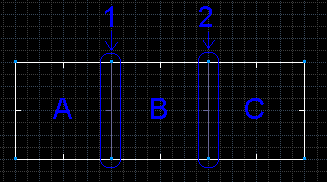
A thing to remember about blocking sound, two lines with this marked is needed to fully block sound. This does not mean put two lines close together to achieve the effect. It is programmed this way so you can achieve realistic effects. Refer to figure 1, the lines labeled 1 and 2 are flagged as blocking sound. If the player is standing near the line in room A the monsters in room B should be able to hear him right? While the monsters in room C shouldn't as they are too far away. However, if you are in room B the monsters in rooms A, B, and C should be able to hear you as they are only 1 room away. Now that that issue is cleared, on to sidedefs!
A linedef must hold 1 or 2 sidedef(s). A sidedef holds upper, lower, and middle textures. A sidedef also holds alignment data for the particular side. It is important to remember that the alignments apply to all three textures on the side.
Vertices are self-explanatory. They are a x-y coordinate pair that usually are the points connecting lines. Nothing interesting here.
If you plan on using SLADE, please read section 2 anyways, I will assume you have learned any comments I may have thrown in the Doom Builder section.
2. Doom BuilderOne of the popular map editors as of this writing is Doom Builder [http://www.doombuilder.com/] by Pascal vd Heiden. In my opinion it is easier to use then SLADE (discussed in the next section). Most of the time while using Doom Builder you will be using the mouse.
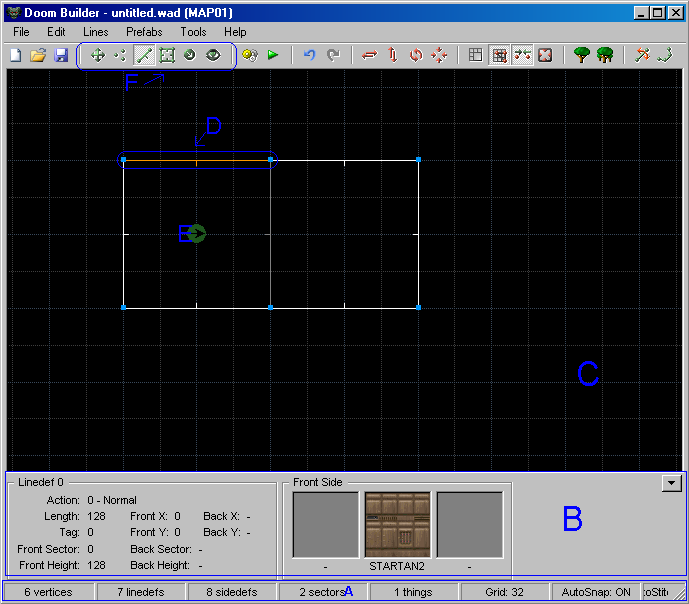 Figure 2 |
Please refer to figure 2. Statistics about the map are located at the vary bottom of the screen. Here for can find out how many sectors, linedefs, sidedefs, etc are in your map. There are also a few informative things down there also that do not relate to the map, such as the grid size. Above that (B) there is a summary of the selected item (usually high lighted in orange).
The editor screen (C) is where you'll spend most of your time. Please note that Doom Builder does have a 3D mode, accessed by a button in section F, so this 2D mode will not always be visible. While in lines mode (explained later) using the right mouse button will begin drawing your sector. After that the left mouse button will begin a new line, coming back to the start vertex will close your sector.
D is pointing out the high lighted linedef in which B is showing information about. To achive this just hover your mouse over a line while in lines mode. E is a thing, in this case a player 1 start. To create a thing right click while in things mode. Right clicking your newly created thing will allow you to edit the thing.
Now your probably wondering how to change modes. Section F points to all the mode, move, vertecies, lines, sector, things, and 3D (in that order). Move mode is in my opinion useless, alternativly you can zoom out and back in with the mouse wheel, but I'm sure others will find a want to move the level with the mouse. Vertecies mode will allow you to move vertecies. To move something, press and hold the right mouse button then drag the line, thing, or vertex where you wish for it to be. While in vertices mode you can split lines by right clicking over a line (this creates a new vertex). Also like all modes you can delete vertices, and thus all lines connected to it, by left clicking a vertex and pressing delete. Lines mode is where you can edit, and move lines. The right mouse button will begin drawing a new sector much like in sectors mode. The only difference between the two is when you use the right mouse button while something is high lighted.
2.1. Linedef Editing Figure 3 |
Linedefs contain most of the level behavior triggers (switches and trap activation). Refering to figure 3 (right click a line to bring up this menu), you see linedef action followed by a number, all actions in doom have a number assigned to them, however most editors simplify the process by allowing you to select from a list, which is pulled up by the "Select Action..." button. If you pull up the menu, in some configurations (Boom compatible), there will be a tab named "Generalized Linedefs" this allows for you to specifically pick the behavior you want the line to activate. Back at the "Standard Linedefs" tab you have a key for the letters and numbers at the beginning of the line action type. In some configurations, some lines do not contain these codes, these are activated one at level start. A door action (represented by "D") is similar to a switch, however it applies to to the sector behind the line. The rest should be straight forward.
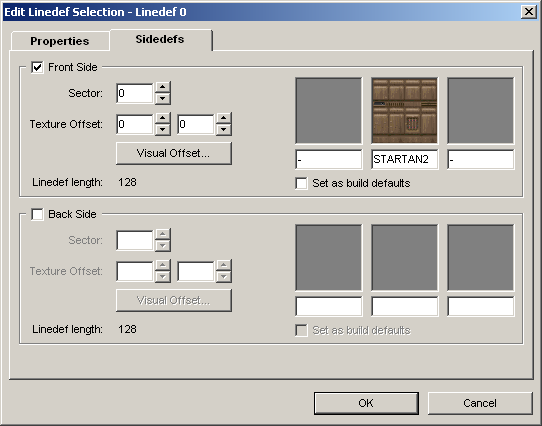 Figure 4 |
Back at the menu in figure 3 we have sector tag, I recommend you attempt to use sector tags in order because the "Next Unused" button isn't always reliable. Sector tags link a sector to one or more sectors and are not required for doors. Flags allow you to change how the Doom engine handles the line. Impassible stops all actors (monsters and players) from crossing the line. Block Monster is the same as impassible, only it only applies to monsters. Double sided is used on all lines you can pass and states that the linedef contains two sidedef entries. Upper and Lower unpegged change the way alignments are handled. Lower unpegged is used on door tracks to prevent them from scrolling with the door, it is also used to keep the lower texture aligned with the middle texture. Upper unpegged is generally used for the upper texture alignment. (If your interested in reading further I recommend the article on the Doom Wiki [http://doom.wikia.com/wiki/Unpegged].) Secret makes the automap show the line as red, this does not actually create a secret counted at the intermission. Block sound as stated before blocks sound after two lines with this flag. Hidden keeps the line from appearing on the map during play. Shown in contrast makes it always appear on the map, even if the player has not yet seen it.
On the "Sidedefs" tab we are able to edit the sidedef entries (see figure 5). You should see both a front and back entry (the back entry grayed if the line is not double sided). A sidedef entry is linked to the sector shown in the sector field, this generally does not need to be changed. To me the texture offset fields and he "Visual Offset.." button are not vary useful, and to be honest, I think most of the sidedefs tab is useless (besides the sector number), since most of this can be done via 3D mode, its best to leave it to 3D mode. To the right of those settings are the textures, the left most one is the upper texture, the middle is the middle texture, and the right most is the lower texture. "Set as build defaults" is an editor setting and has nothing to do with the sidedef.
2.2. Sectors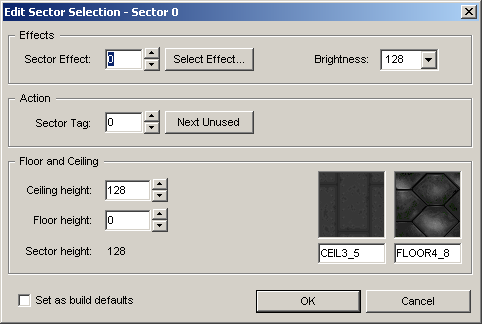 Figure 5 |
The next (mostly useless) dialog, see figure 5, can be reached by right clicking a sector in sectors mode. The main concerns here are the sector effect and sector tag feilds, the rest can be set in 3D mode. A sector effect allows you to make the floor damaging, control lighting behavior, set the sector as a secret (that will be counted on the intermision screen), in some configs, scroll the floor and/or ceiling, and create wind. Most of these actions can be selected by clicking the "Select Effect..." button. However, possibly due to an editor limitation, Doom Builder does not list the secret effect for hexen format, which is 1024.
Sector tag, as been said before, links the sector to linedef actions. Brightness and floor/ceiling height should be easy to figure out. For brightness the lower the value the darker the sector (0 being at or close to complete black). Floor/ceiling heights can be negative, and usually its not a good idea to have the ceiling value lower then the floor value. The left texture represents the ceiling and the right texture represents the floor. In the origional engine, these texture had to be special 64x64 image, however newer ports generally allow for the floor/ceiling and wall textures to be interchanged. As said in the previous section the "Set as build defaults" is an editor setting and has no effect on the game.
2.3. Things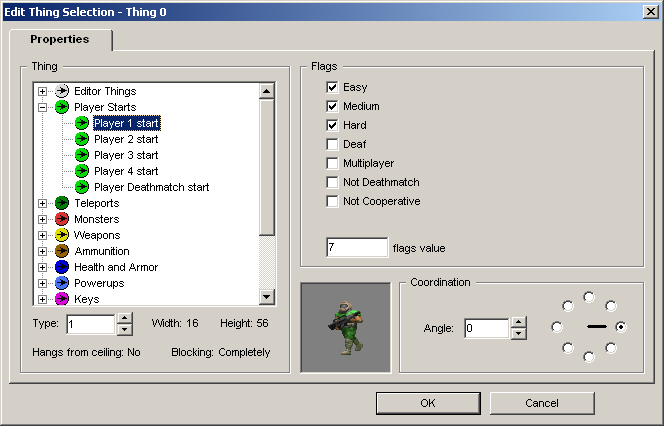
Right click a thing to bring up a dialog like in figure 6. All of the things can be selected by the categoried list. One exception is the "Editor Things" category, in there is a 3D mode start point, other wise 3D mode will start at the first thing you create. If used the 3D mode start point should be removed before releasing your project. The flags should be fairly self-explanatory, easy applies to the first 2 skill levels, medium applys to skill 3, and hard is skills 4 and 5. Deaf generally only applies to monsters and it prevents them from being awoken by sound. Multiplayer makes the object appear only during multiplayer games. The "Not Deathmatch" and "Not Cooperative" flags prevent the object from appearing in the specific game mode, these appear only in Boom. The angle by the sprite sets the direction the object faces at the start if applicable.
2.4. 3D ModeDue to the many abillities of 3D mode I will only cover it breifly. Firstly, it is important to remember you need at least 2 sectors to enter 3D mode, this is due to the node builder needing at least such to build the nodes (these are important to the renderer). You can enter 3D mode by the tool bar or alternativly you can press W. As of this writing one limitation of 3D mode is it can not render 3D floors or slopes in the advanced configurations.
By default the controls for 3D mode are E, A, S, D for movement, forwards, left, backwards, right, respectivly. Using the mouse to turn and look up/down. G toggles gravity, T toggles thing mode. By left clicking a wall, floor, ceiling, or thing a menu will appear for you to select a new texture or thing to replace it with. The scroll wheel of the mouse will allow you to raise or lower and thing (if supported by the config), floor or ceiling. Holding ctrl will allow you to change the brightness of the sector. The values will be changed by eight, holding shift will allow for changes of one. W exits 3D mode. More controls can be found by pressing F5 (tools, configuration on the menu), then clicking on the "Shortcut Keys" tab on the dialog that pops up.
3. SLADEAnother popular map editor is SLADE [http://slade.mancubus.net/] by Simon "SlayeR" Judd. The controlling method for SLADE is more complicated then that of Doom Builder in my opinion, however at the time of this writing SLADE 1.x has an advantage with 3D mode displaying slopes in the zdoom formats. For this section, I will be using SLADE 2.0 Beta1, which does not display slopes in 3D mode, but supposedly that will come later.
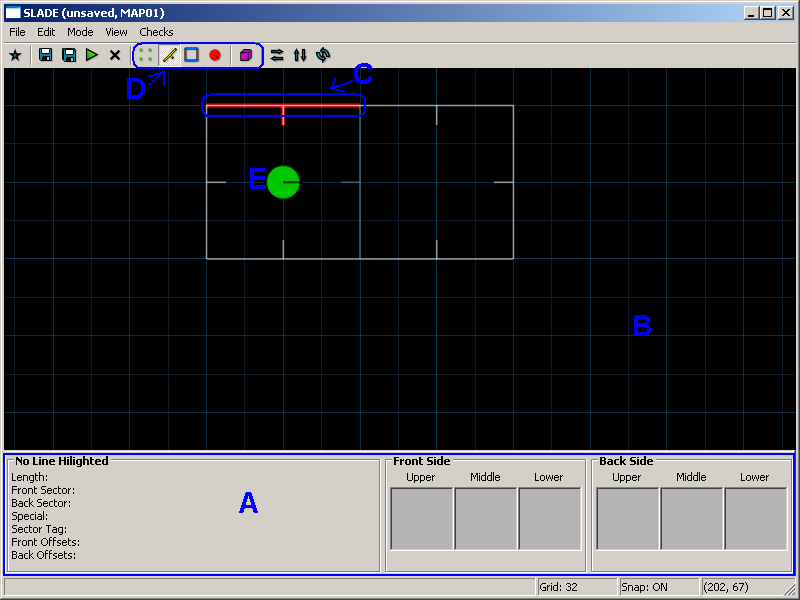 Figure 7 |
Please refer to figure 7. In the section labeled A, we see information about the linedef/sector/thing selected by hovering the mouse over the said item (It will be highlighted in blue). It works like the corresponding part of Doom Builder, one advantage here is the textures are labeled as to where they appear, (Upper, Middle, Lower).
Section B is the 2D editing screen. To begin drawing a sector you press the space bar and a vertex will appear at your mouse cursor. Move this vertex to the desired location and press the left mouse button to begin drawing your sector. An interesting part of SLADE as you are able to draw a sector in any mode (except 3D). To insert a thing you must be in things mode and right click the editor panel, on the menu that pops up click "Insert Thing". To any a thing/line/sector you must right click on the said item and click on "Properties". To move and item right click and drag (the item will then be highlighted in green).
C is a selected line and E is a thing. SLADE is able to display things as their in-game sprite via an option in the Edit, Preferences, Visual tab. D are your mode buttons, in order, vertices, lines, sectors, things, and 3D.
I will not go into detail on all the various editing windows in SLADE as its possible to apply what was said about Doom Builder to SLADE (the window layouts are just a little different). One big difference is in the things window, in order to select a thing you must click the "Change" button.
3.1. 3D ModeThe control scheme for SLADE's 3D mode is similar to Doom Builder. Two differences is movement is done with W, A, S, and D, and lighting is controlled by the + and - keys. I am unsure about the other controls as I personally use Doom Builder. You can get a control list under Edit, Preferences, Input tab.
Back to TOC